 OB Lite
You don't need to have used GitHub before. No programming background, no vocabulary to revise beforehand. Every English screen you'll meet is explained one at a time — what each button does, and what state you're left in after you press it.
By the time you reach the end, your Obsidian notes will open on your phone, and every version you've ever saved will be kept. The same Obsidian you already use — except you can carry it with you.
Before you start
You only need three things.
A PC with Obsidian
Windows or Mac, with the vault (notes folder) you already use.
Time to read, not just click
The clicking is quick. The explanations are there so you understand what you did — read at your own pace.
An email address
Used to create your free GitHub account in step 1.
What you get for one afternoon of setup.
Let's be straight about the deal before you spend any effort on it. You came here to read your notes on your phone — that's the obvious one. The reason we suggest going through GitHub rather than something simpler is that the same one-time setup quietly hands you all four of the things below, and then never asks you for anything again.
Your notes, on your phone
Read and edit your whole vault from anywhere, in a browser. Nothing to install and nothing to configure on the phone itself — the setup is all on the PC side, and it happens once.
Nothing you write can be lost again
Every save is kept as its own version, forever. Deleted a paragraph in March and want it back in December? It's still there. Not a backup of the latest state — a record of every state.
A dead PC stops being a disaster
A full copy lives somewhere other than your desk. Laptop stolen, drive dead, coffee spilled — you sign in on a new machine and your notes are there, history included.
No monthly fee, and no lock-in
Obsidian's official Sync is $4–5 per month. Private GitHub repositories are free and unlimited. And because the notes are plain files in your repository, no service going away can strand them.
And the honest cost: one sitting to set it up, and then two clicks whenever you finish writing on the PC. That's the whole ongoing burden. If that trade doesn't sound worth it to you, it's completely fine to close this page — better than getting halfway and feeling stuck.
First, the picture
What are we actually doing here?
Every screen from here on is in English, and most of the words are borrowed from software engineering. That's the real difficulty — not the clicking. So before the first step, here is what the words mean and what you are actually setting up. It is smaller than it sounds: you are making a second copy of a folder, and opening that copy from your phone.
Your "vault" is a folder you already have
Obsidian doesn't keep your notes in a database or in the cloud. It keeps them as ordinary text files, in an ordinary folder on your PC. That folder is what Obsidian calls a vault. You could open it in Explorer or Finder right now and see your notes sitting there as files. Nothing about this guide changes that — the folder stays exactly where it is.
GitHub is a place that keeps a copy — and remembers every version
GitHub is a service for storing folders online. It's built for programmers, which is why the wording feels technical, but the thing it does is simple: it holds a copy of your folder, and it remembers every version of every file you ever saved. Not just the latest one — every one. Delete a paragraph by accident in March and you can still read it in December. A stored folder is called a repository (often shortened to "repo"). Private repositories are free and unlimited, and private really does mean only you.
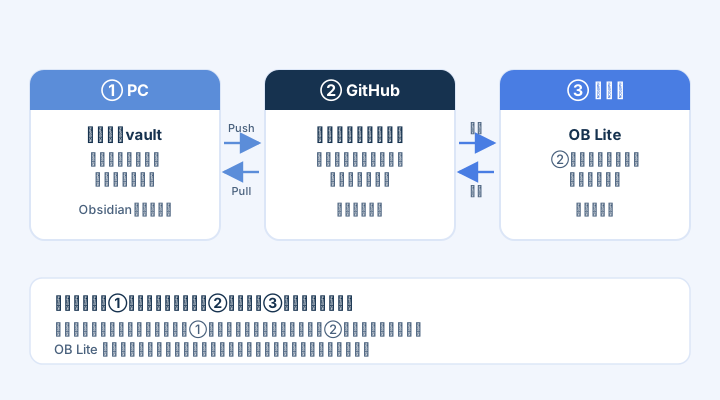
The whole route, before you start walking it
Four steps. What matters isn't how long each takes — it's knowing what you'll have at the end of each one, so you always know where you are.
Create a free GitHub account
You now have a place to put things. Nothing has been uploaded yet — your notes haven't moved at all.
Turn your vault into a private repository
A copy of your vault folder now sits on GitHub, visible only to you. The original stays on your PC exactly where it was.
Learn two moves: send, and receive
What you write on the PC now reaches GitHub when you want it to — and every version is kept, so mistakes are undoable.
Open it on your phone with OB Lite
You can read and edit your notes from anywhere. Nothing to install, nothing to configure on the phone.
The worries people actually have
Could I lose my notes doing this?
No. Nothing gets moved or deleted — a copy is made. Your vault folder stays on your PC, untouched, and Obsidian keeps working exactly as before. If you abandoned this guide halfway through, you'd be no worse off than now.
Will other people be able to read my notes?
Not if the repository is private, which is what step 2 sets up. A private repository is invisible to everyone but you — it doesn't appear in search, on your profile, or to other GitHub users. There is one checkbox that decides this, and we'll stop at it.
What if I click the wrong thing?
Almost everything here is reversible. A repository can be deleted from GitHub in about 30 seconds, and deleting it doesn't touch the notes on your PC. The one thing worth reading twice is the private/public choice — so we flag it in the step itself.
Does any of this cost money?
No. A GitHub account, unlimited private repositories, and GitHub Desktop are all free. OB Lite is free to read and edit your existing notes; only the extras are paid, and there's no subscription.
Do I need to learn git?
You need four words: commit, push, fetch and pull. Step 3 explains them with a picture. There is no command line anywhere in this guide.
Does OB Lite get to see my notes?
Our servers never receive them. Your phone talks to GitHub directly, and the access token lives only on your device and expires after 8 hours. That's why there's no monthly fee — there's nothing on our side to pay for.
The English words you'll see on screen
GitHub Desktop has no Japanese interface, so these words will be in front of you the whole time. You don't need to memorise them — this table is here to come back to.
| On screen | What it means |
|---|---|
| repository | A stored folder, together with its full history. Your vault becomes one. |
| local | On your own PC. "Add local repository" = the folder already on this machine. |
| remote / origin | The copy held on GitHub. "origin" is just its default name. |
| publish | Send it to GitHub for the first time. Not the same as "make it public". |
| private | Only you can see it. This is the setting your notes need. |
| commit | Record a snapshot of the current state. Stays on your PC. |
| push | Send your recorded snapshots up to GitHub. |
| fetch | Ask GitHub whether anything new is there. Changes nothing. |
| pull | Actually bring those changes down to your PC. |
| main | The name of the default (and, for you, only) line of history. |
| merge | Combine two sets of changes. Usually automatic and invisible. |
| conflict | Git couldn't decide which version wins, so it's asking you. Nothing is lost. |
Create a free GitHub account
GitHub is a service that stores folders ("repositories") online with full version history. The free plan is all you need — private repositories included.
- Open github.com/signup in your browser
- Enter your email address and create a password
- Pick a usernameThe username is public, so avoid your real name if you prefer. Your notes will NOT be public — they go in a private repository.
- Verify the confirmation code sent to your email — done
Turn your vault into a private repository
GitHub Desktop is the official app that lets you use GitHub without any commands. You point it at your vault folder, and it does the rest.
- Download GitHub Desktop from desktop.github.com, install it, and sign in with the account from step 1
- Choose File → Add local repository and select your vault folderNot sure where your vault is? In Obsidian, click your vault name in the bottom-left corner — the folder path is shown in the vault switcher.
- A message says the folder isn't a repository yet — click "create a repository", keep the defaults, and press Create Repository
- Press Publish repository, make sure "Keep this code private" is checked, and publish"Private" means only you can see it. This is the setting that keeps your notes yours.
Add local repositoryLiterally: "add a folder that's already on this computer"
Points GitHub Desktop at your vault folder and says "this is the folder I want to track". It reads the folder. It doesn't move, copy or change anything.
- Your notes are byte-for-byte unchanged
- Nothing has been uploaded anywhere
- You have NOT made anything public
create a repositoryLiterally: "make a storage box with a history"
Adds one hidden folder called .git inside your vault. That folder is where the version history will be kept. This is the moment your folder becomes a repository.
- The history box exists, but is still empty
- Everything is still only on your PC
- Obsidian carries on exactly as before — it ignores
.git
Publish repositoryLiterally: "send it up" — NOT "show it to the world"
This is the first moment anything leaves your PC. It creates the matching repository on github.com and uploads your notes into it. The word "publish" is misleading here — whether anyone else can see it is decided by the checkbox below, not by this button.
- A copy of your vault exists on GitHub
- The original on your PC is still there, unchanged
- You can now reach your notes from your phone
☑ Keep this code privateLiterally: "keep this private" — the one checkbox that matters
Decides who can see the repository. Ticked = only you, forever, until you personally change it. GitHub ticks it by default, so usually you're just confirming — but confirm it anyway.
- Nobody else can open it, even with the exact URL
- It doesn't appear on your profile or in any search
- It stays free — private repositories cost nothing
You can switch a repository from public to private at any time in Settings → General → Change repository visibility. Do it soon rather than later, but it is fixable.
Good to know: images and attachments inside the vault are uploaded too. GitHub allows up to 100 MB per file, and a repository works best under about 1 GB — plenty for a notes vault.
One more minute: tell git what to skip
Obsidian constantly rewrites a few files that record which notes you had open. If you don't exclude them, GitHub Desktop will show "changes" every single time — even when you wrote nothing. Nothing is broken, but your real edits get buried in the noise. This is the single most common reason beginners think something went wrong.
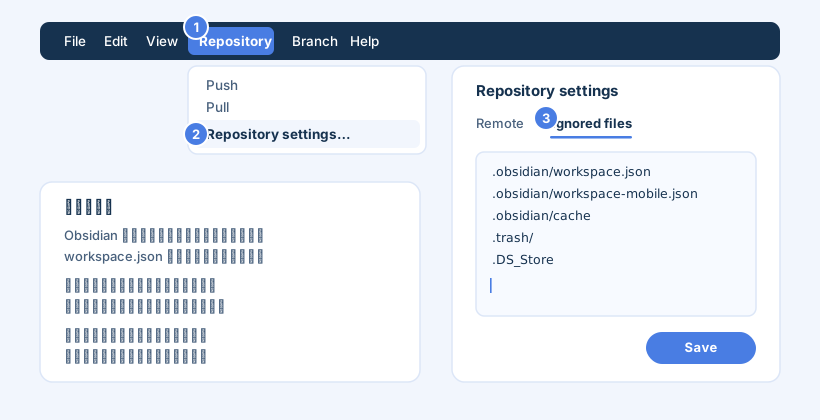
- In GitHub Desktop, open the Repository menu and choose Repository settings…
- Click the Ignored files tab — this is the contents of your .gitignore file
- Paste the five lines below at the end, then press Save
.obsidian/workspace.json
.obsidian/workspace-mobile.json
.obsidian/cache
.trash/
.DS_Store
Why keep the rest of .obsidian? Your themes, hotkeys and plugin settings live there too, and syncing those is genuinely useful — that's how a new PC picks up your setup. Only the "which pane was open" files above are worth skipping.
Your new daily habit on the PC
From now on, GitHub Desktop is a "save to cloud" button for your vault. Two moves cover everything — but first, what those moves actually are.
Commit, push, fetch, pull — in plain words
These four words are the entire vocabulary you need, and they trip everyone up at first because they sound like one action but are deliberately split into two. Here's the picture. Think of it as a photo album. Writing a note changes the room; commit takes a photo of the room and glues it into an album kept on your desk; push posts those album pages to a fireproof archive. They're separate on purpose — you decide when a moment is worth photographing, and separately when to send it off.
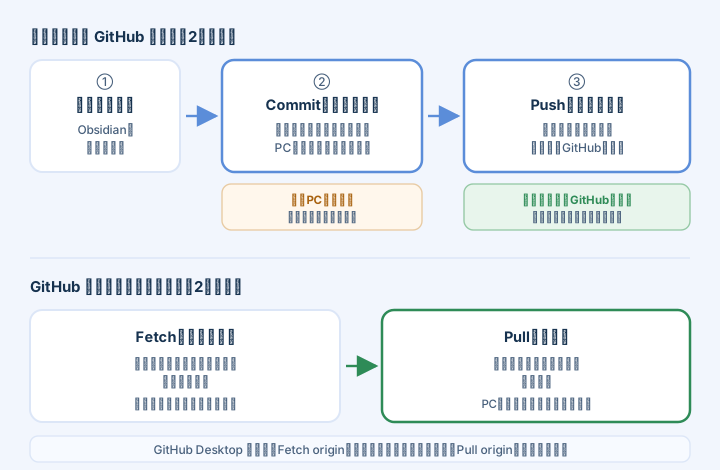
Commit to mainLiterally: "record this into the main line of history"
Takes a snapshot of every change you've made since the last one, labels it with the summary you typed, and files it in the history stored on your PC. The summary is only for you, later — "notes" is a perfectly good one.
- This exact version can be restored forever
- Nothing has been sent to GitHub yet
- The changed-files list empties, which is how you know it worked
Push originLiterally: "push it to the copy on GitHub" (origin = that copy)
Sends every snapshot you've committed but not yet uploaded. If you committed five times today, one push sends all five, keeping them as five separate restore points.
- GitHub now matches your PC
- Your phone will see the new version
- You have an off-site backup — a dead PC no longer means lost notes
Fetch originLiterally: "go and look" — the safest button in the app
Asks GitHub whether anything new has arrived — usually something you wrote on your phone. It only looks. If there is something, the button turns into Pull origin.
- Not a single file on your PC has changed
- You simply know whether you're behind
- Safe to press at any time, as often as you like
Pull originLiterally: "pull it down to me"
Brings the changes down and applies them to the folder on your PC, so Obsidian shows what you wrote on your phone. Pressing this before you start writing is what prevents conflicts.
- Your PC is up to date with everything
- Notes you wrote on your phone appear in Obsidian
- If both sides changed the same note, you'll be asked to choose — see below
So the daily habit is just two moves
- After writing on your PC: open GitHub Desktop, type a short summary (e.g. "daily notes"), click Commit to main, then Push originCommit = record a snapshot. Push = upload it to GitHub. That's all the git you need.
- Before writing, if you edited on your phone: click Fetch origin → Pull to bring those changes down to the PCFetch = check whether anything new is on GitHub. Pull = actually bring it down. GitHub Desktop shows Fetch first, and it turns into Pull when there is something to take.
Bonus: every commit is a restore point. Deleted a note by mistake last week? The old version is still in your repository's history on github.com.
If you forget to pull first
The move above is the one people skip, so let's be honest about what happens. If the same note was edited on your phone and on your PC since the last sync, git can't decide which version wins — that's a conflict. It sounds alarming, and it isn't. Nothing is lost: both versions still exist, and you just tell git which lines to keep.
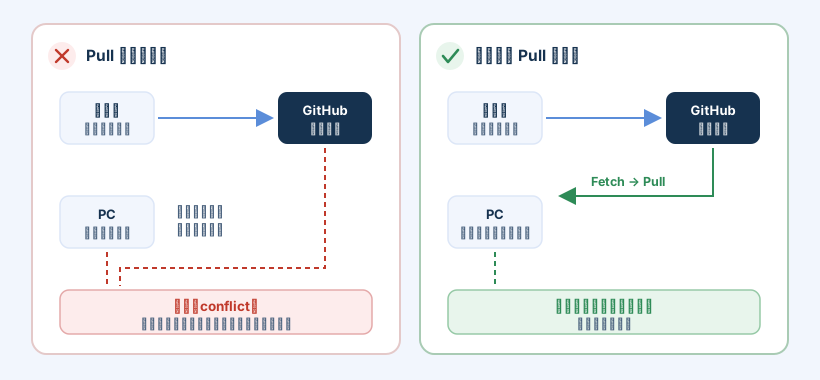
- GitHub Desktop shows the conflicting file with a yellow warning and an Open in editor button
- Open that file. Your two versions sit between marker lines: <<<<<<<, ======= and >>>>>>>Above the ======= line is what's on your PC. Below it is what came from GitHub — that's your phone's version.
- Delete the part you don't want, and delete the three marker lines too, so the note reads normally again
- Save the file, return to GitHub Desktop, and press Continue merge → Push origin
The habit that prevents all of this: before you start writing on the PC, press Fetch origin once. It takes a second, and it's the whole difference between "sync just works" and "now I have to repair a note". If you remember one thing from this guide, remember this one.
Tired of pushing by hand? On your desktop Obsidian, the community plugin obsidian-git can commit, push and pull automatically on a schedule — no more opening GitHub Desktop. It requires installing Git itself on your PC and a bit of configuration, so we'd call it an intermediate option. When you're ready, follow our obsidian-git setup guide. (The plugin's rough edges are on mobile — and that part is OB Lite's job, so your phone setup stays untouched.)
Open it on your phone with OB Lite
This is the part it was all for. Your phone needs zero git setup — OB Lite talks to GitHub for you.
- On your phone, open ob-lite.app in the browser
- Tap Sign in with GitHub and, when asked, grant access to only the vault repository you just publishedOB Lite uses a GitHub App: it can only ever see that one repository, and tokens expire automatically after 8 hours.
- Your notes appear. Read, edit, save — every save becomes a commit
- Optional: add OB Lite to your home screen so it opens like a regular appiPhone: Safari → Share → "Add to Home Screen". Android: Chrome → menu → "Install app".
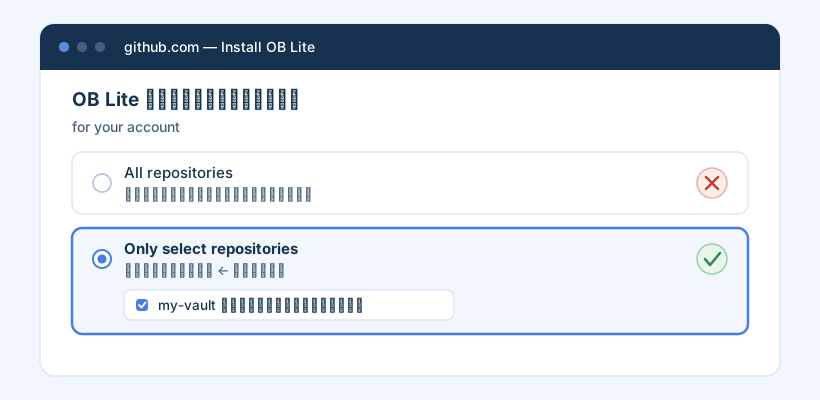
Only select repositoriesLiterally: "only the ones I pick" — choose this, not "All repositories"
Decides how much of your GitHub account OB Lite is allowed to touch. Pick this option and tick your vault, and the permission OB Lite receives simply does not extend to anything else — it isn't a promise, it's a boundary GitHub enforces.
- OB Lite can read and write that one repository
- It cannot see any other repository you own, now or later
- The access expires after 8 hours and is stored only on your phone
Changeable any time at github.com → Settings → Applications → OB Lite → Configure. You can also revoke access entirely there, and nothing happens to your notes.
Read this screen before you tap. GitHub offers All repositories and Only select repositories. Choose Only select repositories and tick just your vault — then OB Lite is structurally incapable of seeing anything else you keep on GitHub. Picking "All repositories" still works, but you'd be handing over access you never needed to give.
About that "sign in again" prompt: your access token expires after 8 hours and is stored only on your device — never on our servers. So roughly once a day you'll tap Sign in with GitHub again. That's the security model doing its job, not a bug.
If something looks wrong
The five things people hit first.
None of these mean you broke anything. Each has a one-line fix.
GitHub Desktop always shows changed files, even when I wrote nothing
That's Obsidian rewriting its window-layout files. Go back to step 2's "tell git what to skip" and add the five lines to Ignored files. If they were already committed once, GitHub Desktop keeps showing them until you commit the .gitignore change — after that they go quiet for good.
OB Lite says it can't find any repository
Almost always the authorization step: the vault repository wasn't ticked. Open github.com → Settings → Applications → OB Lite → Configure and add the repository under "Repository access".
I edited on my phone, but the note on my PC is unchanged
Saving in OB Lite pushes to GitHub, not to your PC — nothing reaches the PC until you ask for it. In GitHub Desktop press Fetch origin, then Pull origin.
Publishing failed, or a file was rejected
Usually a single oversized attachment. GitHub's hard limit is 100 MB per file. Move that video or PDF out of the vault, or add its folder to Ignored files.
My images don't show up on the phone
Check that they were actually pushed — attachments live inside the vault folder, so they upload with everything else unless your attachment folder sits outside the vault. In Obsidian: Settings → Files & Links → Attachment folder path, and point it somewhere inside the vault.

Get new guides by email
Occasional emails when we publish a new guide or ship a notable feature. No spam, unsubscribe anytime.
Thanks — you're on the list! Something went wrong — please try again.